
Key Takeaways
- The uncanny valley in AI faces stems from hyper-symmetry, plastic skin, dead eyes, and lighting mismatches that trigger instinctive discomfort.
- Prompt fixes add natural imperfections like skin texture, asymmetry, catchlights, and precise lighting across Midjourney, Stable Diffusion, and DALL-E.
- Post-processing tools such as GFPGAN, ADetailer, and inpainting can restore realistic eyes, skin, and teeth after generation.
- Advanced techniques like ControlNet with OpenPose and IP-Adapter FaceID provide structural control and consistent identity across multiple images.
- For creators who want to skip the problem entirely, Start creating with Sozee for hyper-realistic, consistent faces with real skin and lighting from your first frame.
Why AI Faces Fall Into the Uncanny Valley
The uncanny valley was first described by robotics professor Masahiro Mori in 1970 while writing about prosthetic hands and humanoid robots. Stylized faces are processed as objects, while photorealistic faces trigger a dedicated, far more demanding face-recognition pipeline in the brain. The fusiform face area (FFA), identified in a 1997 Journal of Neuroscience study, fires within 170 milliseconds of seeing a face. That speed explains why even minor AI errors register as visceral discomfort before conscious thought kicks in.
AI image models are trained toward aesthetic averages: symmetric features, unblemished skin, even lighting, and neutral expressions. These averages sit squarely in the center of the uncanny valley. The fix is to reintroduce the imperfections that make faces read as human.
Quick Fixes: Prompt Engineering for Realism
Prompt-level tweaks work across all platforms and give you cleaner results before you touch any tool-specific settings.
Start by adding skin texture and imperfections to break the plastic-smooth default. Then introduce asymmetry to counter hyper-symmetry. Next, fix the eyes with catchlights and iris depth. Finally, specify lighting precisely and avoid flattering words that pull results toward the uncanny center.
- Add skin texture: Include phrases like “visible pores,” “natural skin imperfections,” “subtle laugh lines,” and “fine vellus hair” to break the plastic-smooth default.
- Introduce asymmetry: Request “slightly asymmetric face,” “one eyebrow slightly higher,” or “natural facial asymmetry” to counter hyper-symmetry.
- Fix the eyes: Add “catchlights in eyes,” “realistic iris depth,” “natural pupil dilation,” and “eyes that focus on camera” to eliminate the dead stare.
- Specify lighting: Use precise directional language like “soft window light from the left,” “golden hour side lighting,” or “single softbox from above” to ground shadows and highlights.
- Add imperfections: Request “freckles,” “a small scar,” “slightly messy eyebrows,” or “one strand of hair out of place” to signal realism.
- Avoid flattering words: Terms like “beautiful,” “perfect skin,” “flawless,” and “8k hyperrealistic” pull results toward the uncanny center. Replace them with concrete descriptors.
Pro Tip: Four of the five main uncanny valley cues—eyes, skin, asymmetry, and motion—are about missing elements rather than added flaws. The uncanny valley often comes from absent imperfections.
Try Sozee for free and see the difference—no prompt engineering required.
Now that you have the general prompt fixes, apply them to specific tools, starting with Midjourney.
How to Fix Uncanny Valley in Midjourney
Midjourney’s default aesthetic smoothing often pushes faces into the uncanny valley. The --style raw flag disables Midjourney’s internal beautification, preserves structural details, and produces documentary-feeling skin. Pair it with a low stylize value such as --stylize 100 or lower. For even more literal results, combining --style raw with --s 30 keeps images accurate to the prompt.
Use --no plastic skin, smooth skin, airbrushed, wax figure to explicitly block uncanny textures. A working prompt example:
hyper realistic portrait of a woman in her 30s, visible pores and skin texture, slight asymmetry in the eyes, natural catchlights, soft window light from the left, shot on 85mm lens, f/1.8, documentary realism --style raw --stylize 100 --no plastic skin, smooth skin, airbrushed
These additional parameters help stabilize results:
--chaos 10for more consistent results across the four-image grid--seed [number]to lock a face geometry you like and iterate on lighting or style--cref [image URL]to anchor facial identity across generations
Common Pitfall: Midjourney’s sweet spot is 20–60 words. Beyond roughly 60 words, the model starts dropping or weakening concepts at the tail end of the prompt. Keep prompts tight.
How to Fix Uncanny Valley in Stable Diffusion
Stable Diffusion gives the most control but needs deliberate settings to avoid uncanny faces.
CFG Scale: Set to 7 for the standard balance. Higher values (9–12) force strict prompt adherence but introduce face artifacts. Lower values (3.5–5) allow natural photographic randomness. For FLUX and SD 3.5 workflows, lower guidance around 3.5–4.5 works best.
Sampler: Use DPM++ 2M Karras or Euler for photorealistic faces.
Negative prompt (essential):
plastic skin, smooth skin, airbrushed, wax figure, dead eyes, asymmetrical eyes, crossed eyes, lazy eye, missing pupils, extra pupils, uncanny valley, deformed, ugly, bad anatomy
Weighted syntax: For SD 1.5 models, use (plastic skin:1.2) to increase emphasis. For SDXL and SD 3.5, plain text without weights often works better.
A working prompt example:
close-up portrait of a woman, visible skin pores, natural skin texture, subtle laugh lines, realistic iris depth, catchlights in eyes, soft window light from frame left, shot on 50mm at f/2, documentary realism
Next, look at DALL-E, which needs a different approach because it does not support negative prompts.
How to Fix Uncanny Valley in DALL-E
DALL-E 4 does not support negative prompts natively, so the strategy is to front-load positive descriptors with extreme specificity. A working prompt example:
Photorealistic portrait of a woman in her 30s, natural skin texture with visible pores, realistic eyes with catchlights, subtle asymmetry in the face, soft window light from the left, shallow depth of field, 85mm lens, f/1.8, cinematic grain, documentary realism
These techniques keep DALL-E outputs grounded in realism:
- Be specific about age and ethnicity: Prompts without explicit ethnicity descriptors still skew toward ambiguously Western European features in many DALL-E 4 outputs. Instead of “a woman,” specify “a 34-year-old Korean woman.”
- Describe lighting precisely: “Soft window light from the left” grounds shadows and prevents the flat, evenly lit look that reads as synthetic.
- Add optical context: Camera terms like “85mm lens,” “f/1.8,” and “shallow depth of field” map the model to natural photographic training data rather than synthetic beauty renders.
Common Pitfall: DALL-E 4 still struggles with teeth. Requests for “natural smile with teeth showing” occasionally regress into the classic uncanny grin. Generate with a closed-mouth smile or fix teeth in post-processing.
Post-Processing Fixes: Editing the Uncanny Out
When an image is almost right, this workflow cleans it up without starting from scratch.
- Fix the eyes with inpainting. In Automatic1111 or ComfyUI, mask the eye area and regenerate with a prompt like “realistic eyes with catchlights, natural iris texture, focused gaze.” For DALL-E 4, its native inpainting respects the geometry of the other eye, the bridge of the nose, and overall facial symmetry.
- Run face restoration. Use ADetailer (Automatic1111 extension) to automatically detect and re-inpaint faces at low denoising (0.3–0.4). This rebuilds eyes, teeth, and skin texture without changing identity. Alternatively, use GFPGAN or CodeFormer for soft restoration that preserves likeness.
- Add skin texture. If skin still looks plastic, run inpainting on the skin area with a prompt like “visible pores, natural skin texture, fine vellus hair.”
- Upscale last. Use ESRGAN or Real-ESRGAN to upscale the full image after face restoration. Running the upscaler first and GFPGAN second produces worse results because the upscaled bicubic blur confuses the restoration prior.
Pro Tip: Reference images consistently outperform text-only prompting for facial realism. Upload a face reference and prompt only for lighting or style changes to maintain consistent identity across multiple images.
Advanced Techniques: ControlNet and Reference Images
Creators who need precise control over pose and face structure can use ControlNet as a structural scaffold on top of the prompt.
- ControlNet with OpenPose: Extract a pose skeleton from a reference image and use it to lock body position while the prompt handles face and style. Start with a ControlNet weight of 0.7–0.8.
- IP-Adapter FaceID: Use 2–3 reference images of the same person from different angles to maintain identity across generations. Set FaceID weight between 0.6 and 0.8. Higher values make expressions stiff, while lower values let the face drift.
- Reference-only mode: For quick variations, use ControlNet’s reference-only feature with Style Fidelity around 0.5–0.75 to borrow the “atmosphere” of a reference face without full identity locking.
Common Pitfall: ControlNet works best when the prompt and the guide agree. If the pose map says “standing side profile” and the prompt says “front-facing close-up,” the result will look strained.
Troubleshooting Table: Common Uncanny Valley Problems
The table below summarizes frequent uncanny valley issues, their likely causes, and the fastest fixes you can try.
| Problem | Cause | Quick Fix |
|---|---|---|
| Dead eyes / glassy stare | Missing catchlights, flat iris texture, no pupil dilation | Add “catchlights in eyes,” “realistic iris depth,” “natural pupil dilation” to prompt; inpaint eyes with focused gaze |
| Plastic skin / wax figure | Over-smoothing from aesthetic defaults | Add “visible pores,” “natural skin texture,” “fine vellus hair”; use --style raw in Midjourney; add “plastic skin” to negative prompt |
| Hyper-symmetry | Model defaults to aesthetic average | Request “slight asymmetry in the eyes,” “one eyebrow slightly higher,” “natural facial asymmetry” |
| Weird teeth | Model struggles with individual tooth rendering | Generate with closed-mouth smile; fix teeth with inpainting or ADetailer |
| Lighting mismatch | Conflicting shadow directions | Specify exact light source: “soft window light from the left,” “single softbox from above” |
| Distorted hands (if in frame) | Model struggles with hand anatomy | Use negative prompts like “extra fingers, missing fingers”; crop hands out of frame if possible |
The Ultimate Fix: Skip the Uncanny Valley with Sozee
All the fixes above act as workarounds. They demand trial and error, prompt tweaking, and post-processing, and you still work against models that default to the uncanny center.
Sozee was built differently. Instead of generating faces from a prompt and hoping for the best, Sozee uses real cameras, real lighting, and real skin, eliminating plastic and uncanny results.

Here’s how it works:
- Upload three photos and Sozee instantly reconstructs your likeness with hyper-realistic accuracy. You can also generate an original character from scratch, with a face that has never existed and stays consistent from the very first frame.
- Likeness stays locked. You get the same face and body every frame, every set, every week. You avoid re-rolling prompts hoping to get your own face back.
- Direct, don’t prompt. Set your Setting, Outfit, Shot style, Expression, and Object. You control five clear dimensions every time instead of gambling on a slot machine.
- Hyper-realism as the standard. If fans can spot it is AI, it fails the test. Sozee aims for hyper-realism that fans cannot distinguish from real shoots.
The uncanny valley exists because general-purpose AI tools average thousands of faces into a plastic, hyper-symmetrical ideal. Sozee focuses on reconstruction rather than averaging. That shift turns image generation into a reliable system for running a brand.
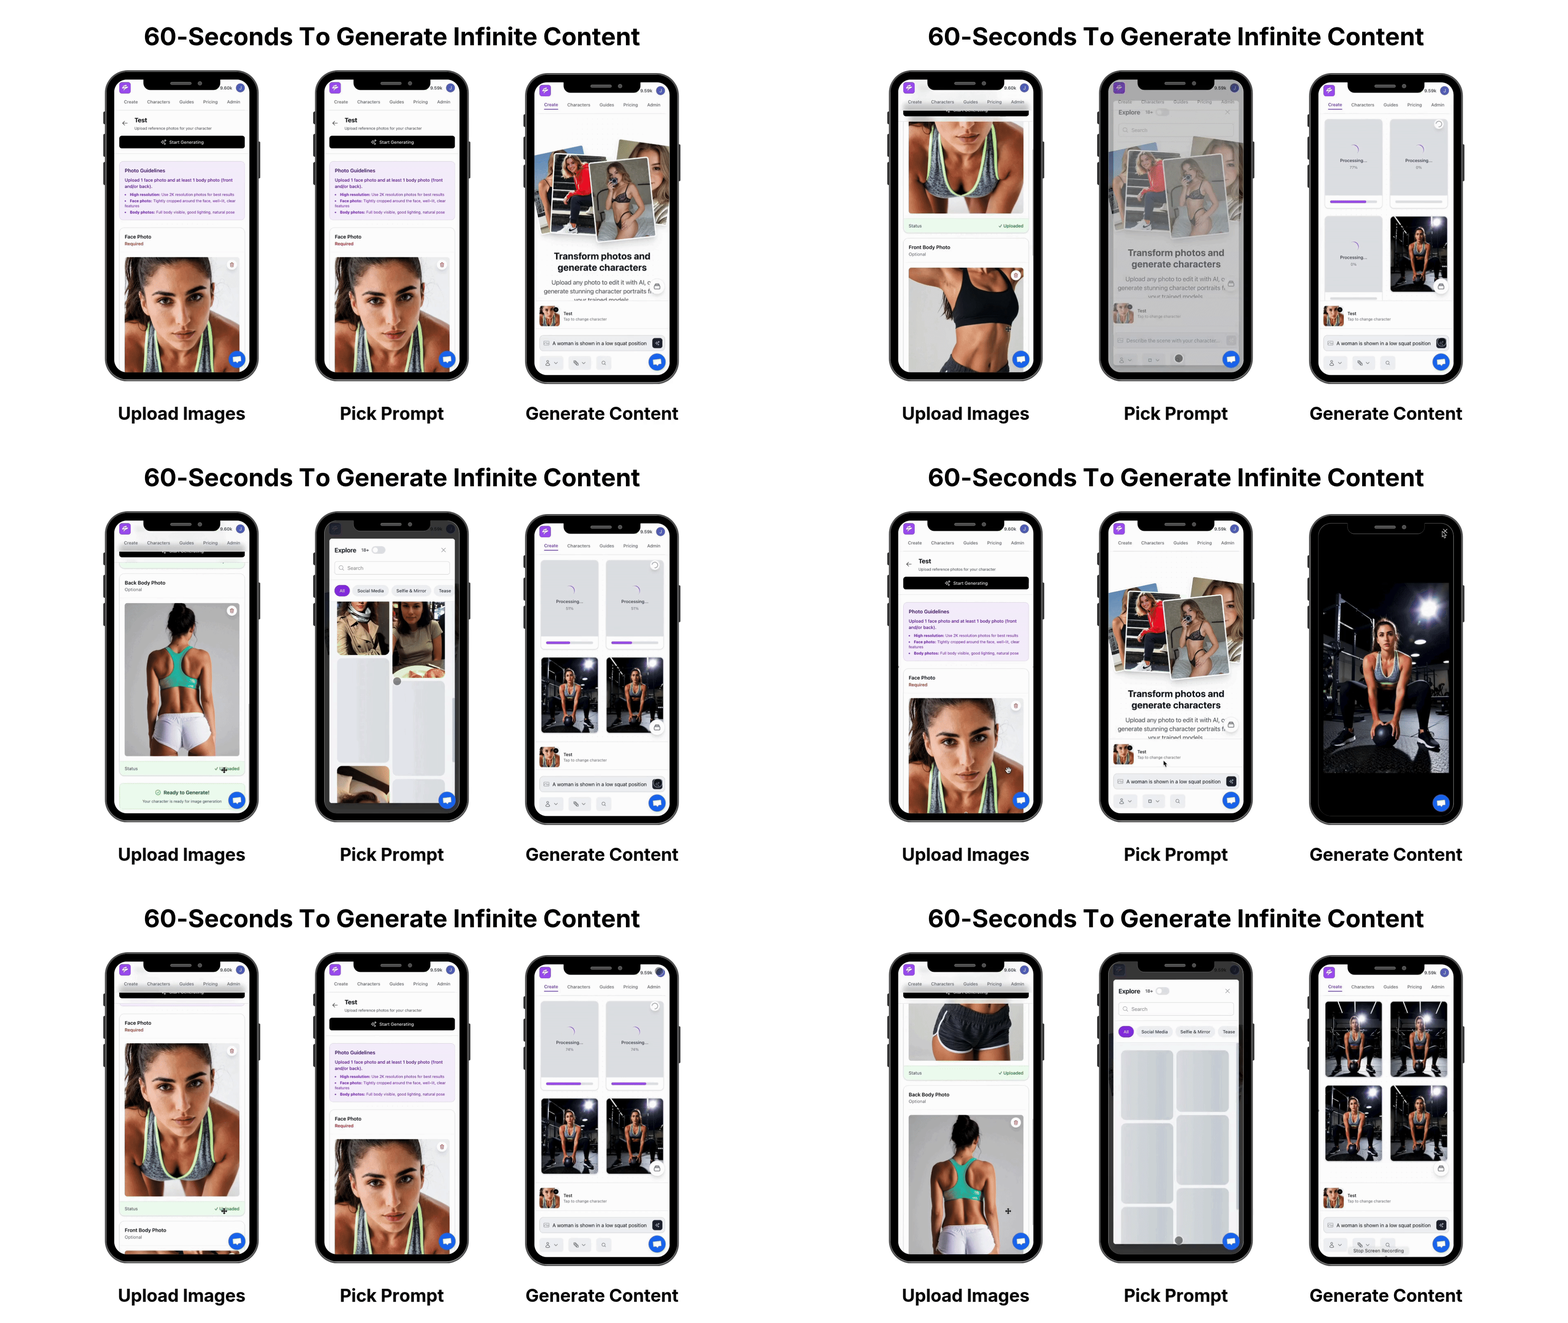
Ready to skip the uncanny valley entirely? Get started with Sozee today and generate hyper-realistic, consistent faces from your first frame.
Frequently Asked Questions
Why do AI faces look creepy?
AI faces look creepy because of the uncanny valley, a phenomenon where near-human faces trigger unease due to mismatched cues. As mentioned earlier, the most common triggers are dead eyes, plastic skin, hyper-symmetry, and lighting mismatches. These inconsistencies are flagged by the brain’s fusiform face area, which processes faces in milliseconds and signals “something is wrong” before conscious thought can intervene.
Can I fix uncanny valley in existing AI images?
You can repair many uncanny images without regenerating from scratch. Use inpainting to regenerate specific problem areas such as eyes, teeth, and skin. Run face restoration tools like ADetailer, GFPGAN, or CodeFormer to rebuild facial details without changing the overall identity of the image. Upscale with ESRGAN or Real-ESRGAN only after face restoration is complete, because upscaling first magnifies flaws rather than fixing them. For best results, work on duplicate layers and keep the original generation so you can revert if a correction pass misses the mark.
How do I fix AI face eyes?
The “dead eyes” effect comes from missing catchlights, flat iris texture, and absent pupil dilation. Fix it by adding “catchlights in eyes,” “realistic iris depth,” and “natural pupil dilation” to your prompt. For existing images, mask the eye area and inpaint with a prompt like “realistic eyes with catchlights, natural iris texture, focused gaze.” Check that both catchlights appear at the same position, for example both at 10 o’clock, to maintain physical consistency with a single implied light source.
How do I add skin texture to AI faces?
Add skin texture by including phrases like “visible pores,” “natural skin texture,” “fine vellus hair,” “subtle laugh lines,” and “slightly imperfect skin” in your prompt. In Midjourney, use --style raw to disable aesthetic smoothing. In Stable Diffusion, add “plastic skin, smooth skin, airbrushed” to your negative prompt. For existing images, inpaint the skin area with a texture-focused prompt or run face restoration with GFPGAN to rebuild realistic surface detail.
Is there a way to avoid uncanny valley in AI art entirely?
You can avoid it reliably by using a tool built specifically to bypass it. Sozee generates hyper-realistic faces with locked likeness, real skin texture, and natural lighting. If you use general-purpose tools, focus on adding imperfections such as skin texture, asymmetry, and catchlights, and specify lighting precisely. Avoid flattering words like “beautiful” and “flawless” that pull results toward the uncanny center. For creators who need consistent faces across a brand or content schedule, prompt engineering alone remains a workaround that demands constant iteration.
Conclusion: Fix It Now or Skip It Entirely
The uncanny valley is a solvable problem. By adding natural imperfections to your prompts, using tool-specific settings like Midjourney’s --style raw or Stable Diffusion’s negative prompts, and running post-processing with face restoration tools, you can push most AI-generated faces out of the valley.
All of these are workarounds that require iteration, patience, and a willingness to fight against models that default to the uncanny center. Sozee was built to skip the problem entirely by using real cameras, real lighting, and real skin, with locked likeness and consistent faces from the very first frame, and without extra prompt engineering or heavy post-processing.
Stop fighting the uncanny valley. Start creating hyper-realistic faces with Sozee and leave the uncanny valley behind.